November 10, 2008
November 9, 2008
Week 12: 3D Workshop
Get out yer 3D Glasses!!!
Above is one of the four 3D flicks made during our 3D film workshop.
For the workshop, we set two Panasonic DVX mini-dv cameras side by side - one camera served as "right eye" and the other as "left eye," - at identical focal lengths. Then, we synced up the footage from both tapes and composited the two "eyes" in After Effects.
Another part of the workshop included creating 3D glasses. Below is the Fall 2009 Class posing with their 3D Glasses.
November 1, 2008
Week 11: Making a Film without the Ususal Suspects
For the 48-hour video race (our final assignment), we will explore the many possibilites of creating films/videos without a film or video camera.
So besides working the "mystery prop" into a 1-3-minute film, we'll need to figure out how to do it without the obvious technology.
This still leaves us with: cell phones, web-cams, digital still cameras (with or without movie mode), rayograms, pinhole shoebox cameras, computer animation, copy machines and of course, their grand-children image scanners. Are silly puddy flipbooks too far out or physically impossible? Jamie suggested a zoetrope and why not? Is there anything I left out?
We've also talked, in the past two weeks about considering the technolgy of choice within the context of concept. For example, consider the warped scanned image of the rubber duck, below:
Our mystery prop, in this case could be a rubber duck, and we're creating a story about the duck living in a universe, where suddenly all the molecules have a war and things start to melt. So we're not just using the scanned images because they look cool, but because it best communicates the story or concept. Incidentally, the warped image was created using only the scanner and by dragging the duck while the scanning progressed.
Oh, and just as a reference point, here's what the duck looked like, before all hell broke loose.
October 22, 2008
ATTACK OF THE 50FT TEACHER - IN 3D!!!!!!
**** 3D glasses sold separately ******
This is a test. This is only a test. If this were an actual B-movie horror/sci-fi flick, you would be seeing several sixbyone students invading the UNCW campus . . . which should be happening around next week.
For best viewing use a pair of anaglyph 3d glasses or hold up a deep-red gel to your left eye and a blue (blue/green) gel to your right eye. CLICK HERE to select the Quicktime movie format instead of the default Flash format offered here. The 3D effect may be more clear in Quicktime.
October 17, 2008
Week 10: In case you didn't get your fill
A couple of supplemental videos within the realm of culture jamming.
ABOVE: POPaganda: The Art and Subversion of Ron English
ABOVE: The Yes Men - Exxon Hoax: Vivoleum Pt1
ABOVE: The Yes Men - Exxon Hoax: Vivoleum Pt2 (The Reggie Video)
ABOVE: POPaganda: The Art and Subversion of Ron English
ABOVE: The Yes Men - Exxon Hoax: Vivoleum Pt1
ABOVE: The Yes Men - Exxon Hoax: Vivoleum Pt2 (The Reggie Video)
October 15, 2008
Week 9: Long-Take Bolextravaganzahhh3!
This past Saturday (yes, we had class on Saturday) our class gathered on campus from 12pm-4pm with the task of shooting (in groups of four) one continuous minute-long take on a 16mm Bolex, then processing the footage in a darkroom and finally projecting and transferring the footage to video.
A few days in advance, the weather forecast was not promising for Saturday: rain and drizzle fo' shizzle.
But, the class was instructed that the show would go on - barring a tornado - and students were strongly encouraged to bring umbrellas, swimsuits, raincoats or other impervious accouterments - hence, a few umbrellas in the long-takes. The result was four pretty off-the-wall long-takes and a rollicking good time.
*****
So, a bit more about the process. As mentioned, the class shot with a 16mm Bolex, which has a 28 second wind (at 24fps - sound speed). Since each group needed a one-minute long-take, they needed to undercrank the camera at half-sound-speed (12fps). Thus, they were able to shoot for 56 seconds. However, when the film was projected at 24fps, it played at twice the speed (see movie clip, below).
In Final Cut, students take the transferred-to-video Bolex footage and invert it to a positive image and then slow the footage down to half the speed to get something closer to reality. See the modified footage, below:
*******
Below, a few more digital stills from the shoot.
*********
AND FINALLY! ~ All four of the long-takes
October 8, 2008
Week 8: Artistic Appropriation or Culture Jamming?
What sentiment do the below pictures convey? Which works lean more toward artistic appropriation and which works lean more toward culture jamming?
Oh, and also a video of Disney clips
Labels:
artistic appropriation,
collage,
culture-jamming
WEEK 7: The Rough Theater
~ The word "excellence" is a foreigner here ~
(Thanks to waterwinterwonderland.org for the image)
This week, we read as a class a short excerpt from the Empty Space, a book by former Royal Shakespeare Company Director, Peter Brook. More specifically, we focused on the concept of "the Rough Theater," an idea of a theater that brings dirt and grit to a performance - a ramshackle theater that might lend more to an audiences enjoyment than a pristine, state-of-the-art theater could. Certainly there are instances where a top-line theater is the best choice, but likewise, there are also instances where a scrappy hole-in-the-wall joint is more appropriate.
While Brook was talking about theater in the traditional stage-theater sense, we could apply the same principles to filmmaking as well as film viewing.
In an age where cameras and other filmmaking tools are becoming more high-tech and able to render image and sound with a hyper-real fidelity, where does black and white 16mm film, shot on the fly and processed in a bucket have a place? Or, with the ongoing desire to equip multiplex theaters with the best seats, projection and acoustic environment, where does a shower curtain, serving as a projection screen, strung up between two trees in someone's backyard have a place?
As the semester goes on, we will explore these questions.
September 22, 2008
Week 6: Pixillation
As we have quite a bit of super 8 footage left over from last week's animation shoot, there is an opportunity experiment with pixillation, a stop motion technique where live actors are used as frame-by-frame subjects in an animated film. The actors repeatedly pose while one or more frames are taken and then change poses slightly before the next frame or frames are clicked off. These actors become living stop motion puppets.
Also, this week, we watched the finished cameraless filmmaking assignment, "the Four Elements." See below, a compilation of excerpts from each of the 8 projects.
Labels:
16mm,
cameraless filmmaking,
experimental,
film,
film-painting,
student
September 19, 2008
Week 5: Super 8 multi-plane animation shoot
This week, our class met for four hours for the super 8 animation shoot. The first hour was spent setting up the multiplane environment and the next three were spent animating.
Below are the completed multi-plane animation projects:
And below are some pix from the shoot.
**********************************************************************************
AND BELOW ARE SOME SHORT VIDEOS OF THE PRODUCTION PROCESS:
**********************************************************************************
One of the components of the animation project was for one or more of the group members to collect random objects while blindfolded and led by another group member and then to animate blindfolded (as seen in the video, below).
And below is the film that made it all possible:
September 17, 2008
Week 4: Putting it all together
(thanks to Lvx Lvcis for the photo)
This week, our class split into two. Half went into "the darkroom" (aka Blackbox) to create Rayograms & experiment with contact printing and half stayed in the classroom to paint/scratch etc. It was an in-class work-day, dedicated to working on the 4-elements projects and applying all the cameraless filmmaking techniques, we've learned thus far.
September 10, 2008
WEEK 3: More film-manipulation techniques
Thus far in class, we've talked about scratching, painting and bleaching film, creating magazine transfers and rayograms in addition to contact printing.
And this is just the tip of the iceberg.
There is so much we can do in the realm of cameraless filmmaking that a semester (much less, six weeks) couldn't possibly cover the territory.
But to arouse your imaginations further, below is another example of film manipuation, inspired by Roger Beebe's TBTX Dance .
This example shows how we can print images (using a standard desktop printer) directly onto clear leader.
First, it helps to have a template that perfectly represents the dimensions of the clear leader on which we will print (in this case 16mm leader).
Print out the template and tape 16mm clear leader, so that the sprocket holes of the film match up with the black sprocket holes on the template.
Then, take the template FILE into Photoshop or some other digital image creating program and superimpose a series of images (I have used vector shapes) within the sprocket holes. Save this as a SECOND file.
Next, take your template with the clear leader filmstrips taped to it and print the second file (the one with the repetative images) onto the template with the filmstrips.
Splice those clear leader strips together, load them into the projector and you're ready to go. See example of projected image, below:
Another movie example:
And a bit of the filmstrip from which the film was created:
To get a filmstrip animation template, CLICK HERE. This pdf document can be printed out and also opened in Photoshop.
Labels:
16mm,
animation,
cameraless filmmaking,
experimental,
student
August 25, 2008
Week 2: Magazine Transfers
This week, we continue exploring film manipulation techniques (last week, we broke the ice with film scratching).
Two of the techniques we'll learn this week are magazine transfers and film painting.
For the mag transfer, we'll be tearing up bits of magazines, newspapers, phonebooks etc. and sticking these bits onto clear packaging tape.
Then, we will cut the packaging tape into strips, dunk the strips into buckets of warm to hot water, leave the strips immersed for about 3-5 minutes and then rub the magazine pulp off the tape.
Only the ink remains on the tape. Then, just slap the strips of tape onto 16mm clear leader film (avoid the sprocket holes) and project.
It's important to note that variables like color vs. black and white or glossy magazine vs. newsprint have an effect on the overall look of the image patterns we create on film. See how printing styles differ, below, by clicking on the CLOSE UPS to see the detailed printing patterns:
above: black and white newsprint
above: black and white glossy magazine print
above: color newsprint (wide view)
above: color newsprint
above: color glossy magazine print (wide view)
above: color glossy magazine print
To catch a snippet of what your magazine transfer might look like, in motion, CLICK HERE
May 15, 2008
Loading the Projector (with single perf film)
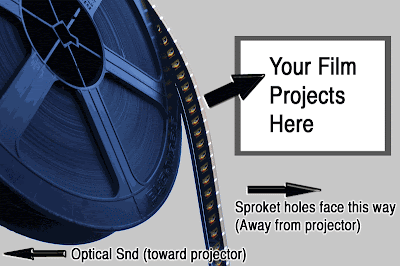
When building reels for Assignment 1, the elements project, it is important to have your film wound properly. This is especially the case with single perf (sprocket holes only on one side) film. Otherwise, the sprocket wheel's teeth can chew up your film.
*Note the above diagram*
The film is coming off the feed reel ~ over the reel ~ and the sprocket holes face right (away from the projector's body). The optical soundtrack faces left (toward the projector's body).
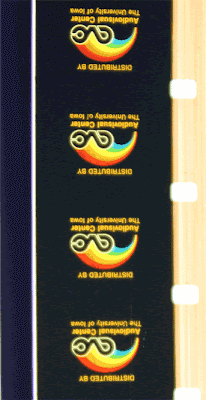
It is also important to note that for any non-abstract images, writing and animation, you should see the images coming off the film reel facing UPSIDE DOWN AND BACKWARDS.
~ Keep in mind though, your perspective to the film reel should be as in the above diagram - with the film coming off the top of the reel AWAY from you.~
This will insure that the images will be projected right side up and forwards. Notice in the below cross-section of the above diagram that the words "DISTRIBUTED BY" are not only upside down, but backwards and that the rainbow in the logo is likewise upside down.
*************************
As for stringing the separate strips of your elements project together, you should start with your reel. Then wedge your TAIL leader into a slit in the reel. You should build in the following order:
REEL < TAIL < 4TH ELEMENT < 3RD ELEMENT < 2ND ELEMENT < 1ST ELEMENT < HEAD LEADER
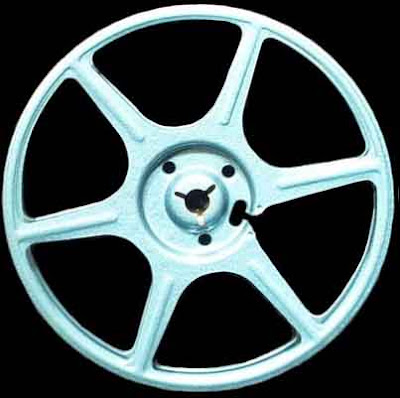
The reel, tail and head leader fall in a fixed order with the elements in between. Of course, you should consider the rhythm and quality of each of your elements and determine in which order the elements should fall.
PLEASE DOUBLE SPLICE ALL ELEMENTS TOGETHER. (This means to tape both the front and reverse side of two adjoining filmstrips). Make sure that the strip ends are free of dust, grit, oil, etc. so that the splicing tape may stick.
SINGLE SPLICE (tape only on one side) the HEAD leader on filmstrip. Note that the HEAD leader I have given you is longer that the tail to allow enough strip to load through the projector and wind onto the take-up reel - so that your first images don't get cut off from view.
In general your film must be DRY (so as not to rust the film gate) and relatively clean. Pat all of your elements with paper towels (don't rub) so as to remove as much oil and dirt as possible.
Subscribe to:
Posts (Atom)